Welcome to the last day of the Fridge Finds blog party! Stop by Andrea's post to see what's in her fridge & what she's cooking with it. I'm pretty pumped to try her lentil recipe - we're always looking for new ways to fix lentils around here! And, just like Andrea, we've been on quite a soup quick lately & it's fun to see some fresh ideas.
Thanks for joining in with this party! If you'd like to see the previous posts, check out these links:
Week 1: Katherine
Week 2: me
Week 3: Rebecca
Week 4: Elissa
Week 5: Meredith
Week 6: Andrea

Tuesday, November 5, 2013
Tuesday, October 29, 2013
Fridge Finds: What's (Really) Cooking, Part 5
Hey friends! It's time for another post in the weekly fridge party! I have to say, I love Meredith's post today. She says it's the worst fridge finds week yet, but it might just be the best. I think we can all relate to the "oh no I have nothing but milk in the fridge and I have to feed my family" moments. Plus, I've always been super curious about eMeals, but haven't known anyone personally to use it. I'd love to hear more about that sometime, Meredith!
Go on, check it out!
Go on, check it out!
Friday, October 25, 2013
Tech Tip Friday: iPad Apps I Love, Part 1
Today I want to tell you about Pepperplate, almost certainly my very favorite iPad app. (And before I launch into this - it's also available for the iPhone, I just don't have an iPhone! There's also a website that lets you do everything, so even if you don't have an iAnything it's worth checking out! And one more note - this is not in any way meant to be an advertisement, I am not being compensated in any way for this - I just want to share an amazing tool with you.)
When my husband & I were considering purchasing an iPad, one of the things I was most excited about was using it to organize recipes. Lugging my dying computer into the kitchen just so I could pull up a recipe was a little bit of a hassle (yes, first world problem, I know), and printing recipes that I might possibly want to make one day caused way too much clutter in the kitchen. Enter Pepperplate!
Pepperplate has 4 main features:
- Recipes
- Menus
- Planner
- Shopping
I mostly stick to the recipe part of the app. My three favorite features of this app are:
- Automatic importing of recipes from 3 dozen supported sites (and the list keeps growing!). Yes, I said automatic. You do not have to sit down & manually type in all of your recipes, although that is indeed an option.
- The "cook now" button. When you click cook now from a recipe, the recipe becomes full screen and the screen does not go to sleep! I don't have to wake up my iPad with messy cooking hands just to see the next step of a recipe - the recipe stays on the screen until I click "Finish cooking". It's wonderful.
- Extremely easy sharing of recipes. I can send recipes to my family & friends incredibly easily, and if they also have a Pepperplate account, then they just click a button from the email to have it added to their account.
Oh, and I didn't even mention that it's completely free! Really, it's an incredible tool - what are you waiting for? Go check it out!
Do you have a favorite iPad app? Let me know - I'll be posting more favorites as they come up, and I'd certainly love to try your favorite!
Wednesday, October 23, 2013
Fridge Finds: What's (Really) Cooking, Part 4
I'm a little late to the party this week, but better late than never! So sorry to Elissa & the rest of y'all who were looking for this. Hop on over to Elissa's post to see a typical week of meals for her family. Sounds like some yummy dinners, and exactly the types of things we like to make around here. (And Elissa... I totally agree... it felt really weird to take a picture of my fridge a couple weeks ago!)
Oh, and this isn't in her post, but Elissa's banana bread is my all-time favorite! Go check it out. (Quick note: I've been most successful making this recipe in a large loaf pan like she says to do. For some reason I didn't think they worked as well as muffins... not sure why, maybe I need to just try again!)
Oh, and this isn't in her post, but Elissa's banana bread is my all-time favorite! Go check it out. (Quick note: I've been most successful making this recipe in a large loaf pan like she says to do. For some reason I didn't think they worked as well as muffins... not sure why, maybe I need to just try again!)
Tuesday, October 22, 2013
Sewing with Kids: T-Shirt Pillow
A while back, I asked for advice on sewing with kids. Thanks to those of you who gave input! I ended up deciding to stick with the book, Sewing School. My friend ordered the book for her daughter, who I'll just call K. Yesterday marked the 3rd week of our sewing "lessons", and it's been so much fun!
K is doing a fantastic job! She just completed her second project, a pillow made out of an old T-shirt. What a fun way to get to hang on to a favorite T-shirt that's too small or has a hole somewhere.

On our first week of sewing together, I tried to gauge what types of projects she was interested in. It turns out that one of K's biggest problems with learning to sew was not really having ideas of things to sew. This really struck me, because I remember the same thing from when I was a kid! I'd ask my mom to teach me to sew, but then when she'd ask me what I wanted to make, I had no idea. All that to say, I love having a book with some kid-friendly projects - instant inspiration! Since we've started, K has had no problem telling me what she wants to sew next. We have quite a list of Christmas projects to work on. :)
I'm hoping that the more K sews, the more she'll be inspired to challenge herself to create new things. I'll keep you posted with more of K's projects!
Tuesday, October 15, 2013
What's (Really) Cooking: Part 3
Hello there, loyal readers! It's Tuesday, which means another chance to see what's really cooking. This week, Rebecca at down the rabbit hole is exploring her pantry. If you've never visited over at Rebecca's site, you're in for a treat! I love reading Rebecca's writing. And I can't wait to make her granola soon.
Tuesday, October 8, 2013
Fridge Finds: What's (Really) Cooking, Part 2
Hooray! It's my week to share what's in the fridge. If you missed it, Katherine is hosting a fun blog party every Tuesday. You can find more info in my post from last week.
So, ever since Katherine introduced this idea, I've been thinking a lot about what's in my fridge. Most days, it's kind of like, "Ugh, why would anybody want to see all of this - it's a big mess!" And some days, when I have a what's-for-dinner crisis, the fridge is sadly lacking in inspiration. Since I've been paying extra attention to what's in the fridge, I've discovered a few interesting things:
1. I use my freezer and pantry to store the main substance of our meals way more than the fridge!
2. We keep a LOT of breakfast, lunch, and toddler-friendly foods in our fridge.
3. I absolutely love when I have leftovers in the fridge.
So, without further ado, here's a very real picture of our fridge:

I realized after taking the picture above that there's no way to really distinguish what's actually in the fridge. So, I did a little rearranging, and ta-da - you can actually tell what a few things are!

Top shelf: buttermilk, sausage balls & applesauce
Next-to-top shelf: eggs & more toddler meal leftovers
Drawer: lots of cheese & some leftover Canadian bacon
Next-to-bottom shelf: more eggs, leftover tortellini soup, pie crust
Bottom shelf: milk, yogurt, sour cream
Drawer: spinach & apples
Now, looking at that list it seems like pretty sad contents of a fridge. But, like I said, most of our food stays in the freezer or pantry!
So, here's what's REALLY cooking this week:
Tortellini Soup (recipe below): Yes, it's already cooked, but these leftovers will be at least one supper & one lunch for us. This was the first time I've made this recipe, and I'll definitely be making it again!
Sweet & sour lentils, possibly with some cooked chicken (from freezer) and/or a spinach salad. This is one of our absolute favorite recipes, and I tend to keep the ingredients on hand in our pantry.
Buttermilk pancakes & fried apples: I love pancakes!
Quiche: Javier thinks we're running low on eggs when we're down to a dozen or so. He could eggs 3 meals a days, 7 days a week. I, on the other hand, tend to get tired of eggs. But, I do like quiche & since we always have more than enough eggs and we currently have lots of random leftover cheese, plus some leftover Canadian bacon, quiche will be perfect!
Taco Soup: I'm planning to head out of town toward the end of the week. So, I need to leave something tasty & easy to reheat for dinners and/or lunches for Javier. It doesn't get much easier than this soup, and it's quite tasty! Again, everything we need for this is in the freezer or pantry...
So, that's it! It's not a terribly exciting list of meals, but pretty normal for around here. We don't usually eat much meat, and I'm very partial to meals that have lots of leftovers. We're in a pretty tough spot where Isaac (16 months) doesn't often like what we're eating as a family, but I'm trying to get better at cooking things we can all eat. We at least try to get him to taste what we're eating, but he's often pretty resistant to putting a new food into his mouth.
Keep checking back on Tuesdays for more fridge finds!
Tortellini Soup
10 oz. frozen chopped spinach
2 (14.5 oz.) cans chicken broth
2 (14.5 oz.) cans stewed tomatoes with basil, garlic, & oregano
1 small bag cheese tortellini
1 small onion, sliced or diced
1-2 Tbsp. minced fresh garlic
1 Tbsp. butter
Garnish: Parmesan or feta
In soup pan, melt butter. Saute onion & garlic. Add broth & tomatoes, simmer for up to 1 hour. Add frozen spinach & tortellini. Simmer on low, for 10-15 minutes until tortellini is cooked to desired tenderness. Season with salt & pepper. When serving, sprinkle with Parmesan or feta cheese.
Tuesday, October 1, 2013
Fridge Finds - It's a Party!
Wow, it's been a long time since I've made myself present in this little space. I have plenty of excuses, let me assure you, but I have way more exciting things to talk about today than excuses!
Today is the first day of a new PARTY! Yep, you heard me - a blog party about what's in the fridge. I'm sure you see lots of blogs that advertise what they're cooking and wonder... "Do they really eat like that? Like all the time?" Or maybe I'm the only who thinks that...
My friend Katherine at rhymes with smile has organized a little bloggy-fridge fun, where 6 of us will share what's REALLY in our fridge, and how that's going to feed our families for the week.
So today - go check out Katherine's fridge and see what she's cooking up this week! You don't want to miss this... the Mexican rice with cilantro dressing sounds amazing!
Be sure to check back next week for part two of Fridge Finds: What's (Really) Cooking.
Thursday, August 15, 2013
Sewing with Kids: Looking for Input
Good morning, sewing friends! Today I'm looking for a little help from you.
I've been talking with a friend about doing some sewing projects with her 9-year old daughter. We're thinking some hand-sewing projects would be best. I've heard good things about the book Sewing School, but am also interested in hearing other ideas. There are so many wonderful resources out there that it can be hard to know where to start looking!

So, have you ever sewn with kids? What projects are a hit, and which ones are flops? Any particular projects that they really loved?
Thanks for the help! I'll keep you posted on what we decide to do.
Linking up with Needle & Thread Thursday... hoping some of those lovely folks have some ideas!
Wednesday, August 14, 2013
WIP Wednesday
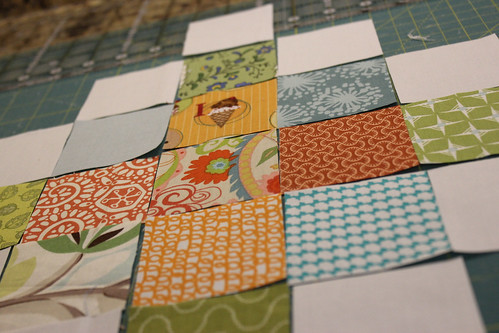
I decided to join in the fun over at Freshly Pieced for today's Works in Progress Wednesday! I've already shared about the beginnings of a granny square quilt, and here's an updated shot of the 5 blocks I've made thus far.
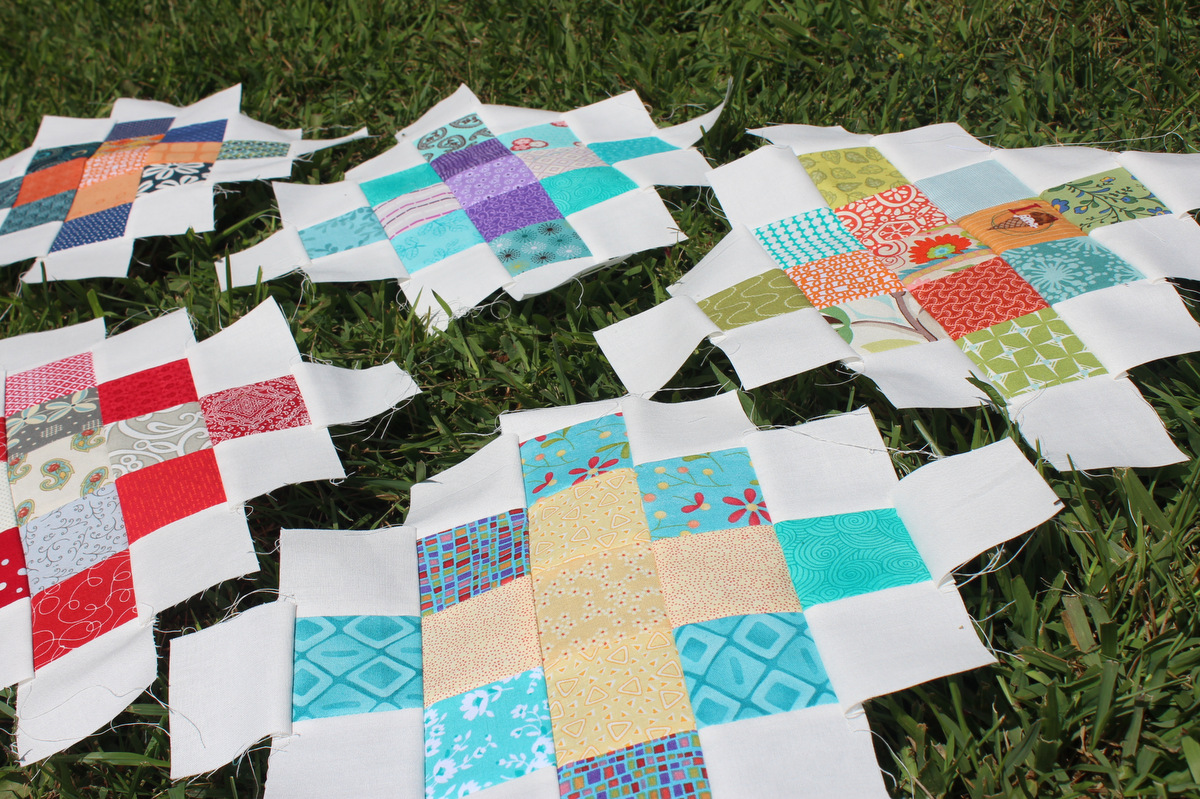
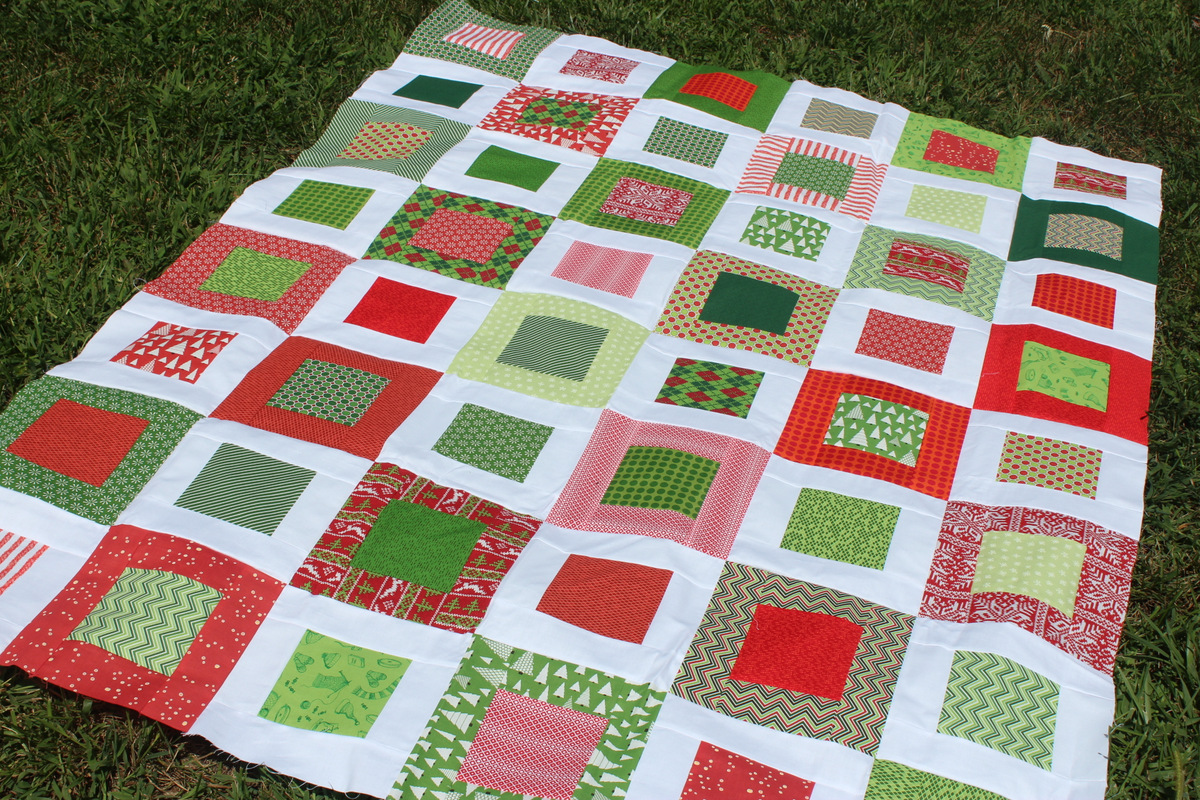
This is a much older WIP. I bought the fabric for this Christmas quilt 2 years ago, did most of the piecing about a year ago, and have left it sitting in the closet ever since. I'm determined that it WILL be finished for this Christmas, so putting it up here will hopefully keep me accountable!
I also have another super-fun WIP but I can't tell you about it yet!! Ahh, so hard to keep fun projects a secret. I better not say too much more... but I'm super excited with how it's looking!
Tuesday, August 13, 2013
Whole Wheat Hamburger Buns
Anyone who knows me & my husband knows that we love bread. We don't just love to eat it, though, we love to make it! While we don't claim to be experts, and we're always looking for shortcuts, we've made quite a few loaves.
A few months ago, we asked to borrow my mom's bread machine. (See, I said we liked shortcuts!) We've really loved using it, and one of our favorites from the bread machine is hamburger buns. How do you make hamburger buns in the bread machine, you ask? Good question! My aunt (who I've mentioned before & invented this amazing candy recipe) sent me a recipe. Using her suggestions & tweaking it a little myself, here it is:
Whole Wheat Hamburger Buns - in the bread machine
Adapted from Food.com
1 cup water
1/2 stick butter, softened or slightly melted
1 egg
3 cups white whole wheat flour
1/4 cup sugar
1 tsp. salt
3 tsp. yeast
1 Tbsp. vital wheat gluten
1. Put ingredients in bread machine, in order suggested by manufacturer. My bread machine says to put liquid ingredients in first, which is how the recipe is listed. Run the dough cycle.

2. Once dough cycle is complete, put dough on lightly floured surface & roll into a log. (Make sure it is LIGHTLY floured - this dough is fairly dry already & you don't want to add much flour to it.) Cut into 12 pieces for normal sized hamburger buns. The original recipe said 8, but they are HUGE.
*Also, preheat oven to 200 degrees about now.

3. Shape into rounds & place on greased baking sheet. The rounds don't have to be too perfect, see?

4. After your oven has preheated to 200 degrees, turn it off. Cover baking sheets with a towel & put in warm oven for about 10 minutes. The dough will rise a little bit, as you can see in the picture below.


A few months ago, we asked to borrow my mom's bread machine. (See, I said we liked shortcuts!) We've really loved using it, and one of our favorites from the bread machine is hamburger buns. How do you make hamburger buns in the bread machine, you ask? Good question! My aunt (who I've mentioned before & invented this amazing candy recipe) sent me a recipe. Using her suggestions & tweaking it a little myself, here it is:
Whole Wheat Hamburger Buns - in the bread machine
Adapted from Food.com
1 cup water
1/2 stick butter, softened or slightly melted
1 egg
3 cups white whole wheat flour
1/4 cup sugar
1 tsp. salt
3 tsp. yeast
1 Tbsp. vital wheat gluten
1. Put ingredients in bread machine, in order suggested by manufacturer. My bread machine says to put liquid ingredients in first, which is how the recipe is listed. Run the dough cycle.
*Also, preheat oven to 200 degrees about now.
5. Once you've taken the risen buns out of the warm oven, preheat oven to 400 degrees. Once preheated, bake buns for 10 minutes. And there you go - delicious hamburger buns!!
The original recipe says these also make good hot dog buns. My aunt has made smaller versions, too, for dinner rolls. The first time I prepared these we had a guest for dinner (I don't know why I always experiment when guests are around...) and he thought they would be excellent by themselves, too. I've also eaten them with chicken salad... all to say this is a very versatile bread! Hope you like these as much as we do!
Friday, August 9, 2013
Finished Baby Love Quilt!
It's finished! The quilt top I showed you in this post is now a finished baby quilt. It measures 36" x 36" and I love it! Thanks to everyone who gave suggestions for how I should quilt it... I ended up doing a square spiral. (Does that even make sense?) These pictures are a little over-exposed, as I still have lots to learn about how to take good quilt pictures, but hopefully you can sort of see the quilting.


This backing fabric is so much fun. All the fabric is from the Riley Blake line "Boy Crazy".

As I mentioned in my post about the quilt top, this pattern came from Camille Roskelley's book, Simply Retro. Well that's it for today - Happy Friday!!
Monday, August 5, 2013
Recipes I'm Loving Lately
We can't stop eating these... so I thought y'all might want to know about them, too.
Peanut Butter Smoothies: Amazing. Taste like a milkshake. Only healthier. We've been eating them for breakfast, or dessert. A great summer treat!

Granola: Finally got around to making this granola from my friend Katherine's blog. I left out dried fruit because that's how I like my granola. Delish. We're almost out... looks like I'll have to make another batch!

And because we are getting TONS of green beans from our garden, we have been making this tasty dish a lot:
Vegetable Trio
4 large carrots
1/2 lb. fresh green beans
1.5 cups sliced fresh mushrooms
1 t. salt
1/2 t. thyme
2 T. butter
Melt butter with spices in a large skillet. Add green beans & carrots over medium heat. Add mushrooms after a few minutes. Cook until beans are tender, about 20 minutes. (And don't let it burn the way I did in the picture!)

Thursday, August 1, 2013
Camera Strap Cover Tutorial Roundup
My camera strap could use a little flair, so I went in search of some ideas. However, there are SO many tutorials out there it's a bit overwhelming. Here are some of my favorite ideas... now I have only to decide what I'll do for mine!

The Cottage Home: Gathered Camera Strap Cover
| she can quilt: His & Hers Reversible Camera Strap Cover
| Everything Etsy: Padded Camera Strap Cover
Kevin & Amanda: Ruffled Camera Strap Cover | Saltwater Quilts: Camera Strap Cover with Lens Cap Pocket
Honeybear Lane: Quilted Camera Strap Cover | lbg studio: Camera Strap Cover with Lens Cap Pocket | Lola Pink: Patchwork Camera Strap Cover
Kevin & Amanda: Ruffled Camera Strap Cover | Saltwater Quilts: Camera Strap Cover with Lens Cap Pocket
Honeybear Lane: Quilted Camera Strap Cover | lbg studio: Camera Strap Cover with Lens Cap Pocket | Lola Pink: Patchwork Camera Strap Cover
Tuesday, July 30, 2013
Picasa Tutorial: Scaling File Size & Resizing for Prints
I've been asked about these picture "tricks" several times by family or friends, so I figured it may be helpful for a few of you, as well.
After a family gathering of any sort, we like to share pictures with each other. It depends whose camera was lying around as to who got the best shots, usually of the kiddos. There have been so many times where I get emails with only 1 or 2 pictures attached because the images are too big to send more at a time through email. Enter my favorite photo tool: Picasa!
Picasa makes it soo easy to scale images to a reasonable size for emailing or uploading to a blog. You may be afraid that you'll lose photo quality this way, but most cameras these days take pictures with a much higher resolution than our computer screens can display or our human eyes can detect. The only reason to have really, really high resolution pictures is if you want to get a giant print of it.
Let's take a look at the quilt top from yesterday in Picasa.
Part One: Scaling File Size
Step 1: Choose your image in Picasa. Click the "Export" button on the bottom of the screen.

Step 2: A dialog box opens. Resize the image to something smaller. The number you resize to is the longer of the sides of the picture. For example, this picture is oriented horizontally, so it's 1200 pixels wide.
You can also adjust the "Image Quality" below the size. There's an option called "Automatic" which is a good standard.

Step 3: After adjusting the size, click "Export". Note: the photo will be in the location specified at the top of the dialogue box. This folder will automatically open after exporting, though, so it's okay if you don't remember where you saved the picture.
And that's it! Now you can email/upload/do whatever with your resized photo and be thankful that smaller pictures upload much more quickly!
Note: You can also resize lots of pictures at once... select them all then follow the above instructions. If you'd like a more detailed explanation of this, please contact me, I'd love to help!
Part Two: Resizing for Prints
I'm sure you've all uploaded pictures to have printed at your local drugstore/Target/favorite photo site and seen the message that says something to the effect of "your pictures are not really 4x6 even though you want 4x6 prints, we'll crop them for you", and then when you've picked up the pictures someone's head is chopped off just a little, but that great picture is now not-so-great. This is also helpful when resizing a picture to something like an 8x10, which has a different aspect ratio than what the picture has by default.
Step 1: Choose your image, then select "Crop".

Step 2: From the drop-down menu, select the size photo you'd like to have.

Step 3: Adjust the selected region on the photo so that no one's head is chopped off & you're seeing what you'd like to see. As you stretch the box that selects the region, the aspect ratio will not change, so no matter how you move or shrink the box, you'll end up with a picture that prints at the correct size. After you have the picture in the selected region looking like you want, click "Apply".

Step 4: The final step is to export the picture. Follow the steps in part one of this tutorial. Then, use the exported picture to order prints & have them come back just as you expect every time!
Monday, July 29, 2013
a little progress on a GIANT churn dash + question
This weekend's project was piecing this fun giant churn dash for a baby quilt top.
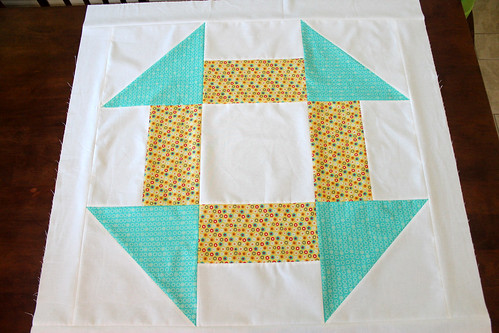
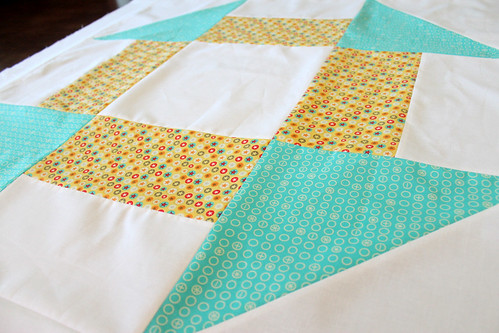
The pattern came from Camille Roskelley's latest book Simply Retro, although it would be relatively simple to turn any of your favorite quilt blocks into one giant block that's perfect for a baby quilt. I loved how quickly this quilt top came together & can't wait to finish it!
The fabric I have for the backing is my favorite of the four fabrics I picked for this quilt. Looking forward to showing you, but I'll wait until the quilt is finished. You'll just have to check back to see!
Question: How would you quilt this? I'm considering zig-zag quilting (as shown in Simply Retro), a big spiral, or possibly concentric squares. What's your pick? Any other ideas?
And if you're stopping by from Plum & June's Let's Get Acquainted Link Up, thanks for checking in! I hope you'll take a look around & come back soon!
Thursday, July 25, 2013
Pillowcase Dress
This pillowcase dress was made for a group who sews for charity. I'd love to tell you more about that group later... so for now, onto the dress!
I've heard how easy pillowcase dresses are, but was still a little skeptical. Well, not anymore! This was a super-quick, fun project. The pattern came from Nancy's Notions. There are no pictures with the pattern, though, so here's how it looks.
Step 1: Cut a piece of fabric to the appropriate length, based on the guidelines in the pattern. I was sewing a size Medium.
Step 2: Match selvages & sew. You don't even have to cut off the selvage! You now have a big tube.
 Step 3: Center the seam on the back of the tube.
 And cut out the armholes, using the pattern.

Step 4: Fold under casing, then edgestitch. My elastic was 3/8" instead of 1/4" like the pattern suggested, so I just made the casing a little bit wider.
Step 5: Thread elastic through casing, stitching at both ends. To make this easier, I didn't actually cut the elastic at first. Instead, I marked 7" from the start and pulled the elastic all the way through the casing. Once the elastic was all the way through, I stitched the "free" end to the dress, then gathered the top until I found where I had marked the 7". Then it was easy to stitch this down without worrying about the elastic disappearing into the casing.
 Step 6: Cut length of bias tape & stitch over raw edges on armholes. This also hides the elastic. I did not bother turning in the raw ends of the bias tape, and also cut the bias tape only 36". This way, 1 pack of bias tape could be used for 1.5 dresses.


You can also add embellishments or pockets to the dress if you want, but I loved this one just how it was. I definitely want to make more of these. Seems like this would also be a really fun project to make with a little girl learning to sew.
I've heard how easy pillowcase dresses are, but was still a little skeptical. Well, not anymore! This was a super-quick, fun project. The pattern came from Nancy's Notions. There are no pictures with the pattern, though, so here's how it looks.
Step 1: Cut a piece of fabric to the appropriate length, based on the guidelines in the pattern. I was sewing a size Medium.
Step 2: Match selvages & sew. You don't even have to cut off the selvage! You now have a big tube.


Step 5: Thread elastic through casing, stitching at both ends. To make this easier, I didn't actually cut the elastic at first. Instead, I marked 7" from the start and pulled the elastic all the way through the casing. Once the elastic was all the way through, I stitched the "free" end to the dress, then gathered the top until I found where I had marked the 7". Then it was easy to stitch this down without worrying about the elastic disappearing into the casing.


Step 7: Hem the bottom, and you're done! Tada - one delightful pillowcase dress!


You can also add embellishments or pockets to the dress if you want, but I loved this one just how it was. I definitely want to make more of these. Seems like this would also be a really fun project to make with a little girl learning to sew.
Wednesday, July 24, 2013
Subscribe to Homemade Engineer!
If you're stopping by here a little more often these days (which I hope you are!), you might be interested in subscribing to Homemade Engineer.
I talked a while ago about my new preference for Feedly, but there are lots of other ways to make sure you stay up to date. Many of you prefer to subscribe by Bloglovin' or by email. Or, if you use a different RSS reader, subscribe to the RSS feed here.
Don't worry, I won't have boring posts like this too often, but subscribing to blogs has been a great way to SIMPLIFY, which I'm all about. Reading blogs from a reader instead of checking the actual site every day gives me more time to, well, read more blogs!
And as always, feel free to contact me with any comments, questions, or great ideas!
Any other favorite ways to follow blogs that I haven't mentioned?
Tuesday, July 23, 2013
What's Stitching with Susan: Granny Square Chair
Today's first-ever "What's Stitching with Susan" post is brought to you straight from my mom! Thanks for guest posting, Mom. :)
Thanks Rebekah for letting me share my finished project on your blog! So for my story... my sister gave me an antique oak chair for my birthday, with intentions of me doing some kind of patchwork seat. (Rebekah here... I love this idea of giving a birthday present that is also a fun project!)
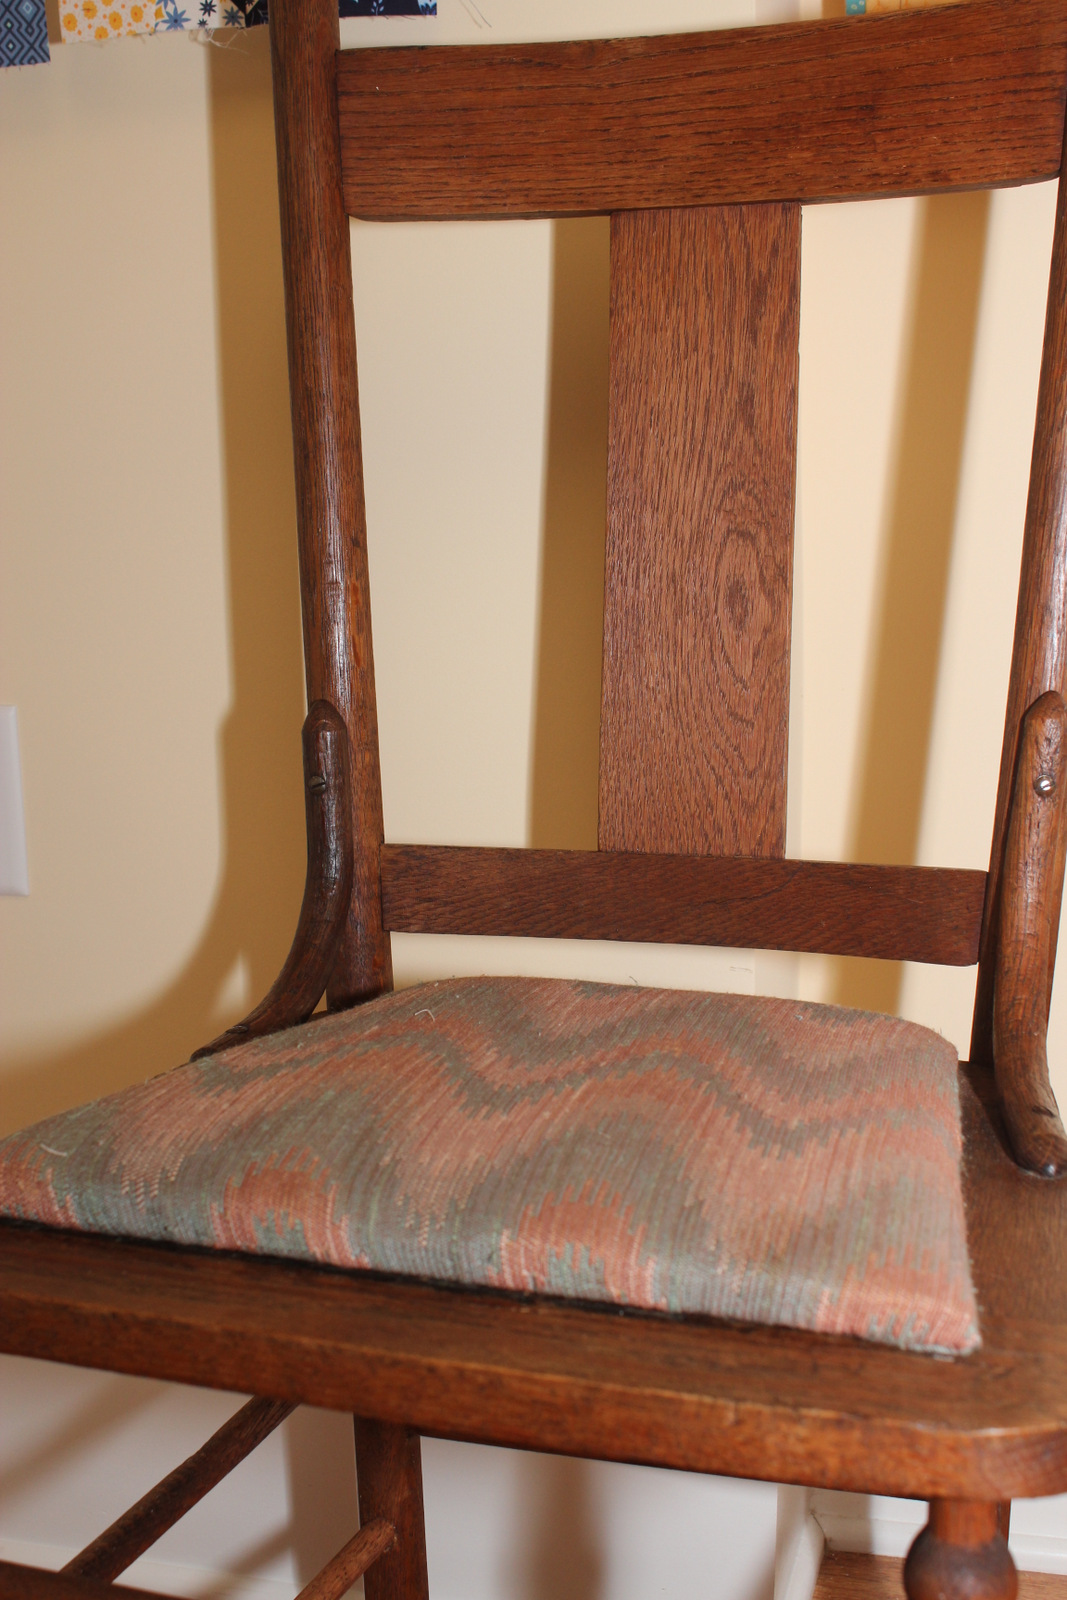
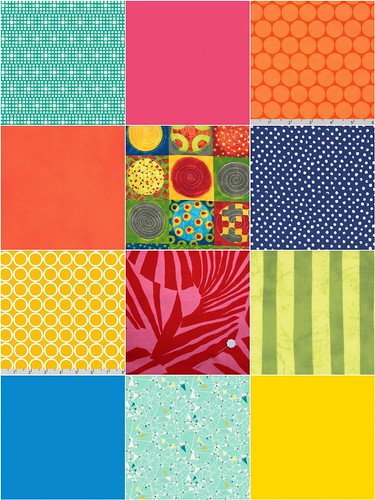
After several weeks of searching for a pattern, nothing seemed to get me excited. When I saw Rebekah's Granny Square, I knew that would work well. I used the same Blue Elephant Stitches tutorial. Rebekah picked out my fabrics for me. I think she has a great eye for color! (Thanks, Mom!) Then I used Essex Linen in Flax for the outer, solid squares.
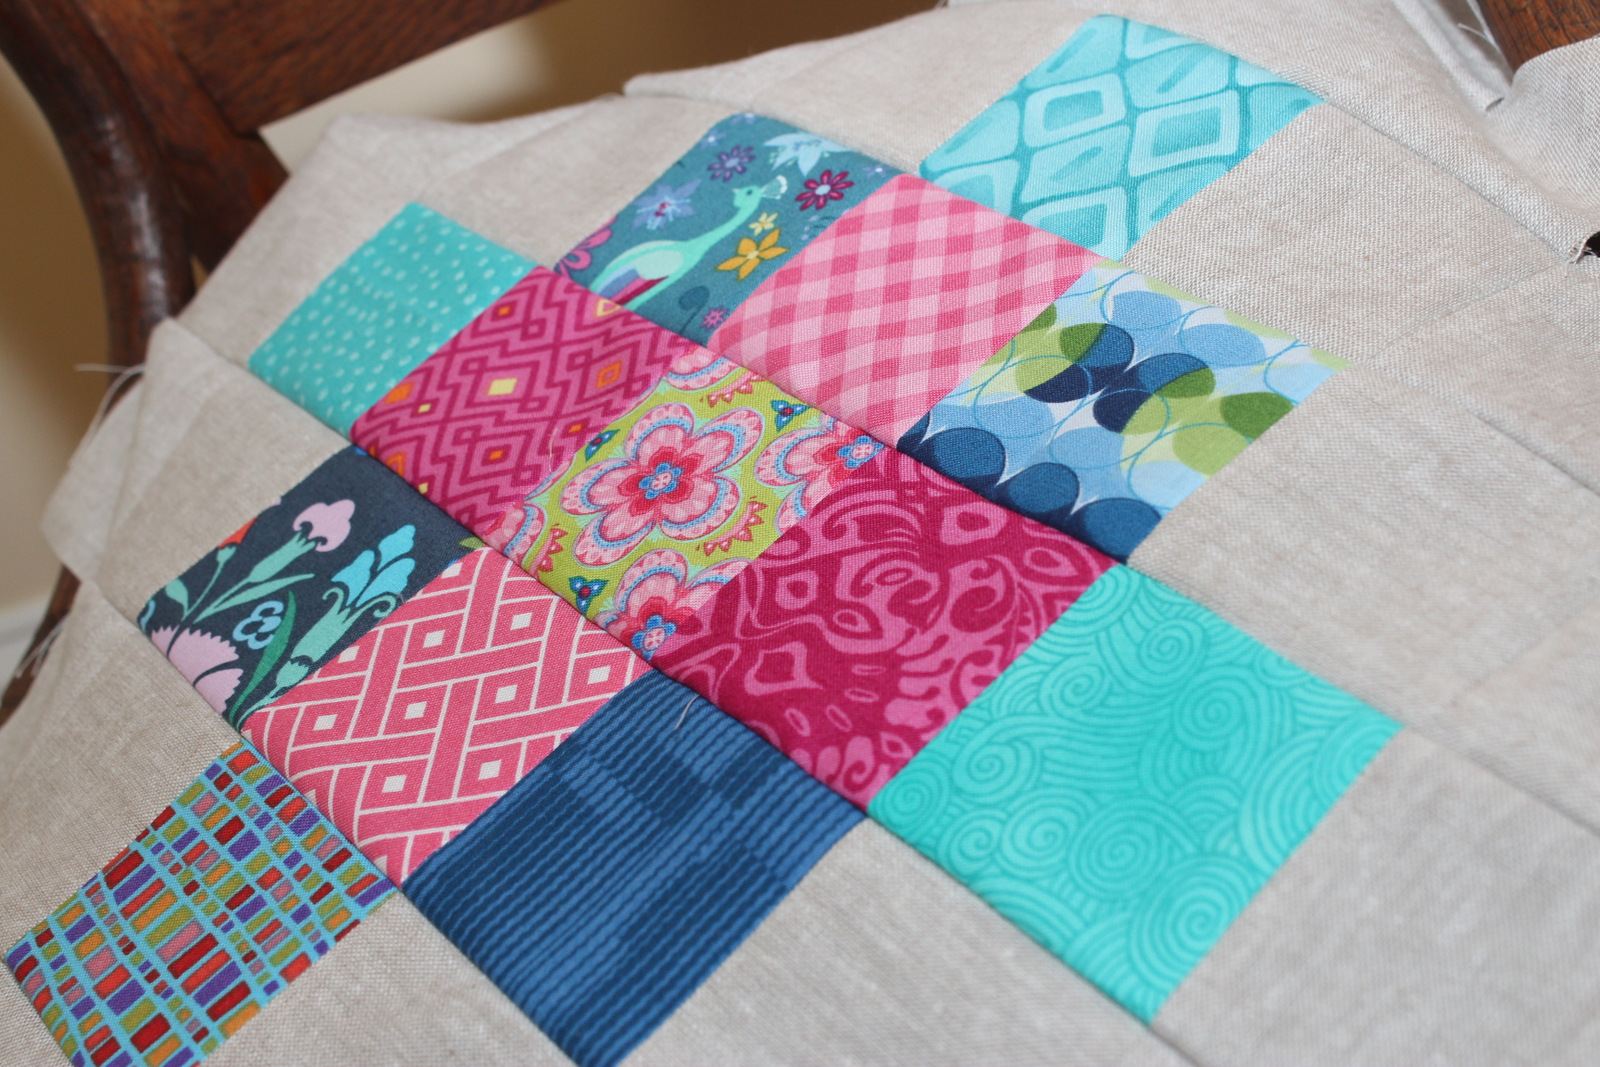
To make the block, I cut my squares to 2.75" (instead of the suggested 2.5") to allow the finished block to cover more of the padded seat. There are also extra Essex Linen squares added on each side. A small strip of linen fabric is then added to get the block to the size I needed to wrap around my padded seat.
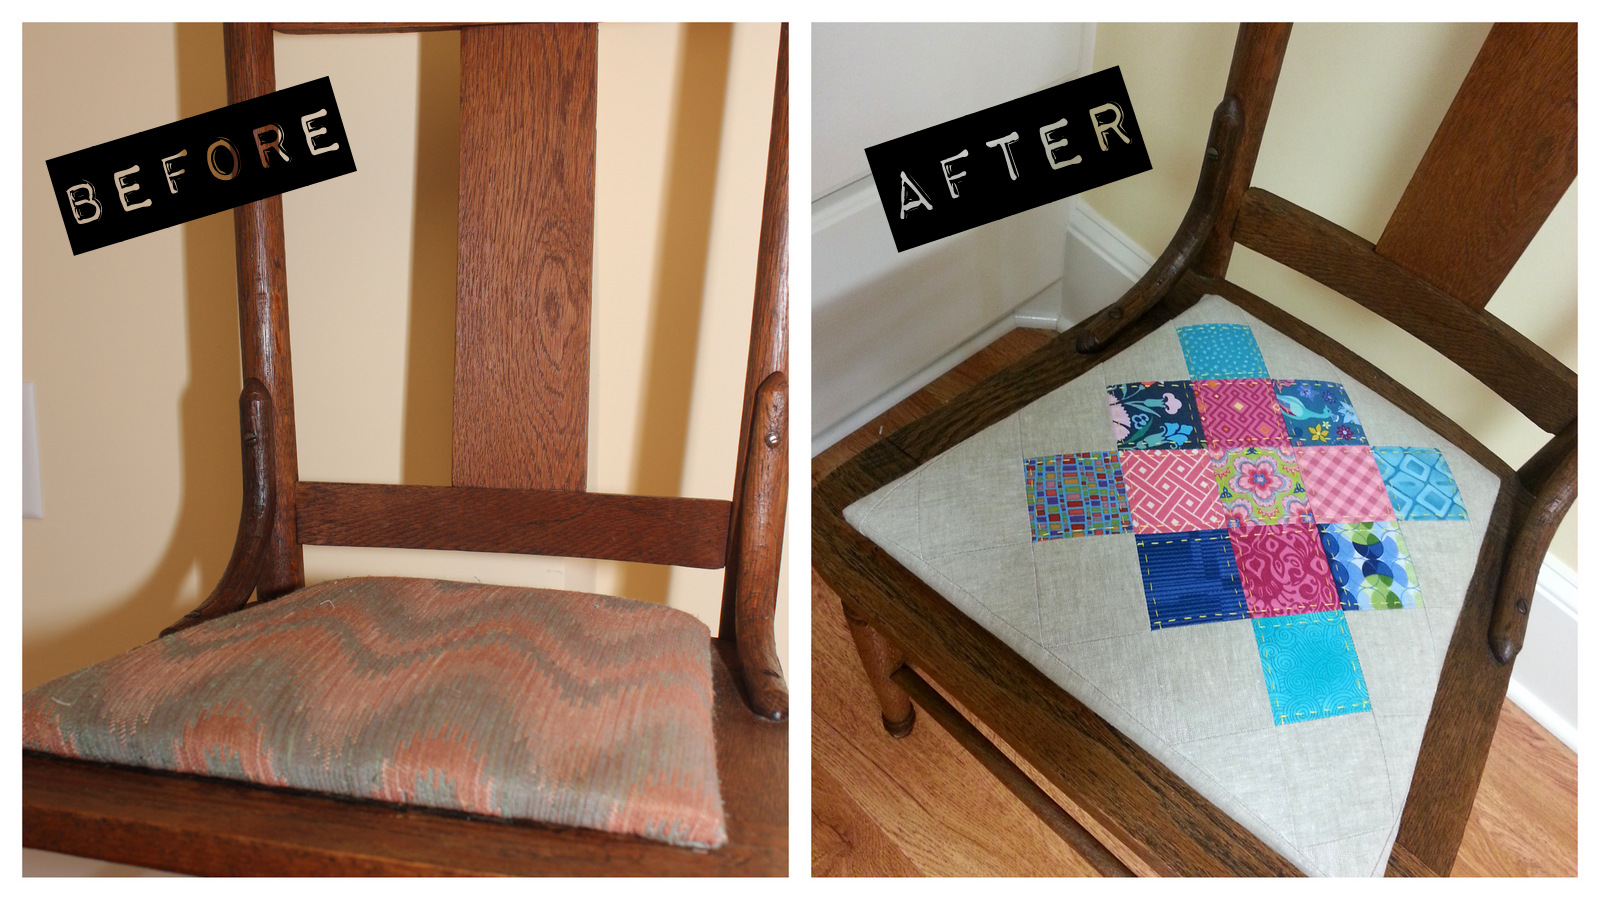
To finish the seat cover, all you have to do is pin-baste a square of batting (I like to use Warm and Natural) to the back of the block and machine or hand quilt, whatever you like. I hand quilted around each block with DMC Perle Cotton No. 8. Wrap your finished square around your seat pad, being careful at corners, then use a staple gun to secure in place. There you have it! A quick quilting project that surely adds some color and style to the chair's new home. My chair is finding its new home in the sewing room!
Thanks Rebekah for letting me share my finished project on your blog! So for my story... my sister gave me an antique oak chair for my birthday, with intentions of me doing some kind of patchwork seat. (Rebekah here... I love this idea of giving a birthday present that is also a fun project!)
After several weeks of searching for a pattern, nothing seemed to get me excited. When I saw Rebekah's Granny Square, I knew that would work well. I used the same Blue Elephant Stitches tutorial. Rebekah picked out my fabrics for me. I think she has a great eye for color! (Thanks, Mom!) Then I used Essex Linen in Flax for the outer, solid squares.
To finish the seat cover, all you have to do is pin-baste a square of batting (I like to use Warm and Natural) to the back of the block and machine or hand quilt, whatever you like. I hand quilted around each block with DMC Perle Cotton No. 8. Wrap your finished square around your seat pad, being careful at corners, then use a staple gun to secure in place. There you have it! A quick quilting project that surely adds some color and style to the chair's new home. My chair is finding its new home in the sewing room!
Monday, July 22, 2013
What's Stitching with Susan
As I've mentioned several times, my mom is my biggest sewing influence and best teacher. If only I had learned more from her while still living at home!
Mom doesn't have a blog but is always busy in her sewing room, so from time to time I'll be featuring her latest projects. Since I just recently visited her, I have a few of her latest stitching endeavors lined up for you to enjoy. Look for the very first "What's Stitching with Susan" post tomorrow!
Mom doesn't have a blog but is always busy in her sewing room, so from time to time I'll be featuring her latest projects. Since I just recently visited her, I have a few of her latest stitching endeavors lined up for you to enjoy. Look for the very first "What's Stitching with Susan" post tomorrow!
Friday, July 19, 2013
Homemade Hand Soap
Since sharing yesterday about homemade all-purpose cleaner, I thought I'd follow up with another way to use Dr. Bronner's castile soap. I'm a little skeptical of all the uses listed on the bottle (toothpaste, anyone?), but I'm willing to try using it for lots of other cleaning uses.

Hand soap is another area I wanted to experiment with. Paying $1-$2 per bottle wasn't that appealing to me, plus I loved the idea of a safer soap. This is even easier than yesterday's cleaner.
All you need for the hand soap:

- foaming soap dispenser. I bought some Method soap from Target just for this & am now reusing the bottle.
- castile soap in your favorite scent (I use Dr. Bronner's citrus scent.)
- water
Fill the dispenser about 2/3 to 3/4 full of water. Top with the castile soap. That's it!
I've noticed this soap almost seems a little "sticky" when I'm using it, but my hands feel clean.
Have you ever used castile soap? What's your favorite use? I'm always looking for more ideas!
Wednesday, July 17, 2013
Clashy Bright Mosaic
I am loving the mosaic contests hosted occasionally by Stitched in Color. The latest one features a clashy bright theme which is so fun for summertime! I had a blast picking out fabrics from Marmalade Fabrics for my mosaic.
First row
Second row
Third row
Fourth row
Homemade All-Purpose Cleaner
Ever since the little guy's been around, I've been a lot more conscious of what kinds of things I'm using around the house. While vinegar is definitely a favorite cleaner & can do pretty much anything, I wanted to something a little different for our everyday all-purpose cleaner.
Enter Dr. Bronner's castile soap. A quick Google search gives you all kinds of amazing uses, but my first use of it was for regular, all-purpose cleaner. To make this cleaner, you need:

- an empty spray bottle. Mine came from The Dollar Tree.
- castile soap. Dr. Bronner's is reasonably priced & can be found just about anywhere.
- tea tree oil. A little pricey, but lasts forever.
- water
Fill your bottle about 3/4 the way up with water. Make sure you add the water first!! Otherwise there are too many suds. Top with soap & about 10-12 drops of tea tree oil. The soap & water are your cleaner & the tea tree oil adds antibacterial properties. Tada, you're done!
If you use a scented soap, your cleaner even smells great. (The smell is a huge bonus if your husband, like mine, can't stand the smell of vinegar - one of the big reasons I was searching for a new cleaner.)
This is a frugal, simple, and effective cleaner! It definitely works for me! For more great ideas, be sure to visit Kristen's blog.

Monday, July 15, 2013
Beginnings of a Granny Square Quilt
Sometimes, I just get bogged down in my current sewing projects. Progress is slow, and I'm a little burnt out. So, what else to do but start a new project?
Sometimes something new, fun, and uncomplicated is what I need. Since I've been eyeing this amazing Granny Square quilt from Blue Elephant Stitches, I figured sewing up a block would be good medicine.

I'm pretty pleased with block #1! Didn't intend for those two flowered blocks to end up right next to each other, but it still makes me happy. :)
Then last week while visiting my mom, she let me cut lots of 2.5" squares from her scrap stash! I love poking through Mom's fabric!!
Here's block #2 all ready to go:
What's the plan for these fun blocks, you ask? Why, I think they would make a sweet little baby quilt. At least that's the plan for now, unless I'm not able to stop with just 9 blocks!
Sometimes something new, fun, and uncomplicated is what I need. Since I've been eyeing this amazing Granny Square quilt from Blue Elephant Stitches, I figured sewing up a block would be good medicine.
Then last week while visiting my mom, she let me cut lots of 2.5" squares from her scrap stash! I love poking through Mom's fabric!!
Here's block #2 all ready to go:
Thursday, June 20, 2013
Goodbye, Google Reader. Hello, Feedly.
As many of you know, Google Reader will be gone as of July 1. If you're like me and are scrambling at the last-minute for how you will read your blogs 10 days from now, then keep reading!
There are several popular alternatives to Google Reader. Do a quick search and you'll see many an article with the title "Top Alternatives to Google Reader". I've been looking for myself and my mom, who has asked for help with this transition. For Mom, I'm looking for a reader that's as similar to Google Reader as I can find. Mom likes Google Reader, and as my dad likes to say, if it ain't broke, don't fix it. For myself, I'm open to something a little different, provided it's still free and easily aggregates my blogs.
Here's what I've found:
1. Feedly: This tops most lists at the moment. However, I didn't like Feedly at first because it was a web-broswer plugin. If that's too much jargon for you, basically it would only work (best) on your own personal computer. If you use multiple computers or like to check blogs when you're away from home, this really wouldn't be a good fit. But, just yesterday Feedly announced that it was moving to a cloud-based model that fixes this complaint. Feedly has a great interface and super-easy transition from Google Reader.
2. The Old Reader: This was my initial pick, as it has a very similar interface to Google Reader. Apparently there's no mobile app for this, though. (I haven't completely verified this - leave a comment if you know of one.) It's also a little more difficult to switch to from Google Reader. However, The Old Reader is a good, solid choice and would definitely get the job done.
3. Bloglovin': I've seen this recommended on several blogs and thought I would give it a try. I lasted all of 2 or 3 blog posts before I decided this is NOT for me! Bloglovin' physically navigates to the actual blog rather than being a true reader. This is SLOW and not how I want to read my blogs. I prefer to read through my blogs pretty quickly, only slowing down when a particular post really catches my attention.
4. All the rest: There are several other choices, primarily with other strengths. As I said at first, I was searching for a reader to mimic Google Reader functionality, not for anything else. Let me know if you have another favorite that I didn't mention!
Bottom Line: Give Feedly a try! Maybe I won't even miss Google Reader. :)
Tuesday, May 28, 2013
oliver + s Bucket Hat
For the little guy's first birthday, I wanted to make him a bucket hat for the summer. I have heard wonderful things about oliver + s patterns, but had never tried one out. They have a free pattern for a reversible bucket hat that was exactly what I was looking for.
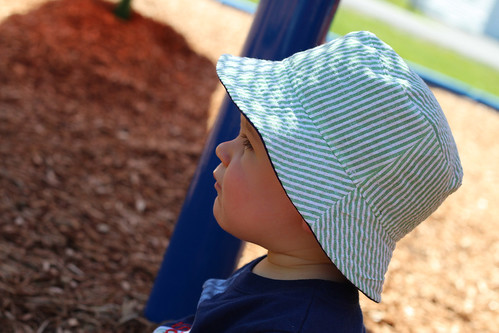
Let me tell you, this pattern was great! Only three simple pieces to cut out.

I've never sewn a hat or something quite that round before and had some reservations, but I was able to follow this pattern step by step & end up with a fabulous hat for my ONE year old little guy.
 I'm considering adding a chin strap to make sure this hat stays on this busy little boy, but then it wouldn't be reversible after doing that. All in all, I'd highly recommend this pattern! I'd love to try some more oliver + s patterns someday.
Let me tell you, this pattern was great! Only three simple pieces to cut out.

I've never sewn a hat or something quite that round before and had some reservations, but I was able to follow this pattern step by step & end up with a fabulous hat for my ONE year old little guy.
Wednesday, May 8, 2013
Works for Me: Audiobooks
 |
| Photo Credit |
After one book club discussion of audiobooks in particular, I decided to try it again. Now, I'm hooked. When Isaac goes down for his nap, I pop on the headphones and get busy with cooking, cleaning, sewing, laundry, you name it! I am so much more motivated to get the chores done when I have the company of a good book. {Confession: there are many, many naps where I get sucked into something not-so-productive - but I'm way more likely to get things done when I have a book to listen to.}
Any favorite audiobooks out there? I'd love some good suggestions!
Check out Works for Me Wednesday for more great ideas.
Monday, April 29, 2013
Sweet Contrary Mosaic Contest
There's another mosaic contest going on at Stitched in Color. I had a lot of fun picking out this spring-y collection of fabrics from Lark Cottons. Tangerine & aqua mixed with some green & purple just happen to be some of my favorite combos. Plus I can't help but think about my lilac bushes when I think of spring... which happen to be blooming right now!

In case you're interested, these are the fabrics I selected:
Row 1: Shelburne Falls: Sparse Floral Willow, Nicey Jane: Hop Dot Olive, Lush: Running Stitch Turquoise
Row 2: Modern Whimsy: Circles Lime, Flea Market Fancy: Posie Turquoise, Glimma: Kulla Tangerine
Row 3: Glimma: Korkek Jade, Heirloom: Paisley Amber, Heirloom: Marquis Amethyst
Row 4: Central Park: Floral Carousel Orange, Architexture: Crosshatch Plum, Perfectly Perched: Nesting Chairs Garden
I really love these fabrics and am excited to have found some new ones I haven't seen before. Don't you think those purple chairs are just so fun?? Thanks Lark Cottons for sponsoring such a fun contest!
Tuesday, April 23, 2013
Yikes... it's been a while.
Well, two months have come & gone since I've last made the time to post anything here! Sorry for those of you who have been checking! Although, I'm guessing that after two months there might not be anyone still interested here. :)
Between a trip to China to visit family & a baby who has decided he doesn't like to nap, the days are flying by with little time to create. But, I have plenty of ideas on my list ever-growing project list.
I really want to make this for Isaac's room with his prints:

And we have lots of family celebrations in the next month & a half... so you can bet there are a few things I want to make. It's good to be back... stop by again soon!
Thursday, February 14, 2013
A Valentine's Day Treat
We don't get wrapped up in the popular idea of Valentine's Day around here, but I certainly always enjoy an excuse to celebrate or do something special. So, I surprised my husband with this A-MA-ZING candy that my aunt introduced to me last week.
Aunt Kay (who doesn't have a blog but it would be great if she did!) had this candy at a local shop, then determined that she would figure out how to make it. Apparently there are lots of versions of this recipe floating around, but here's what she came up with.

Amish Cashew Candy
2 sticks butter
1 cup sugar
1 Tbsp. light corn syrup
1 to 1.5 c. cashews
~1/2 bag milk chocolate chips
Melt butter in saucepan. Add sugar & corn syrup. Bring to a boil, stirring pretty much constantly. Use a candy thermometer to bring the mixture to between 275 and 290 degrees F. This takes around 10-15 minutes.
Once it's reached the right temperature, remove from heat and stir in cashews. Transfer to a buttered cookie sheet & spread as thin as you can with the back of a spoon. Sprinkle chocolate chips on top, then as the chocolate is melting, spread on top of candy.
Refrigerate until hardened, then break into pieces.
 |
| What the candy looked like before it was broken into pieces. |
Javier called this dangerous. He couldn't stop talking about it. So... make this at your own risk!
Thursday, January 31, 2013
Hexagons for Stocking #2
As I mentioned in this post, I'm determined that we will have Christmas stockings next Christmas. Which is why I'm working on them in January. Inspired by these lovely stockings, I decided that mine will be made of hexagons. I don't have too much of it sewn yet, but this picture shows you what I have so far.
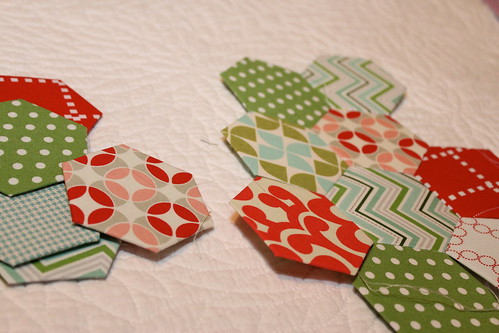
I love all the hexagon work I'm seeing all over the place these days, and I'm coming to appreciate it even more as I've been working on them! There are about as many opinions on the best way to piece hexagons as there are people sewing hexagons, so I've read and read and settled on my technique. I'll post more on that later, but for now, my preferences are:
- cardstock for hexagon templates
- basting on the back, without sewing through the paper
- joining hexagons with a running stitch
Those seem to be the most debatable parts. If you're looking for a good comparison on hexagon options, this post at The Sometimes Crafter was extremely helpful!
Have you jumped on the hexagon bandwagon? What's your favorite approach?
Subscribe to:
Posts
(
Atom
)