Tuesday, July 30, 2013

Picasa Tutorial: Scaling File Size & Resizing for Prints

I've been asked about these picture "tricks" several times by family or friends, so I figured it may be helpful for a few of you, as well.

After a family gathering of any sort, we like to share pictures with each other. It depends whose camera was lying around as to who got the best shots, usually of the kiddos. There have been so many times where I get emails with only 1 or 2 pictures attached because the images are too big to send more at a time through email. Enter my favorite photo tool: Picasa!

Picasa makes it soo easy to scale images to a reasonable size for emailing or uploading to a blog. You may be afraid that you'll lose photo quality this way, but most cameras these days take pictures with a much higher resolution than our computer screens can display or our human eyes can detect. The only reason to have really, really high resolution pictures is if you want to get a giant print of it.

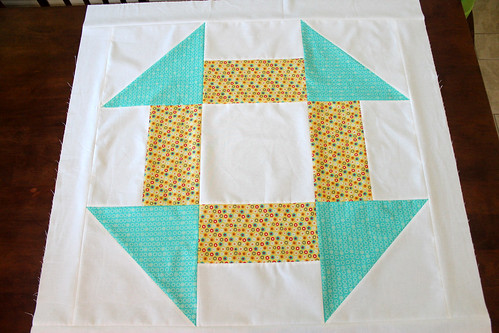
Let's take a look at the quilt top from yesterday in Picasa.

Part One: Scaling File Size
Step 1: Choose your image in Picasa. Click the "Export" button on the bottom of the screen.


Step 2: A dialog box opens. Resize the image to something smaller. The number you resize to is the longer of the sides of the picture. For example, this picture is oriented horizontally, so it's 1200 pixels wide.

You can also adjust the "Image Quality" below the size. There's an option called "Automatic" which is a good standard.


Step 3: After adjusting the size, click "Export". Note: the photo will be in the location specified at the top of the dialogue box. This folder will automatically open after exporting, though, so it's okay if you don't remember where you saved the picture.

And that's it! Now you can email/upload/do whatever with your resized photo and be thankful that smaller pictures upload much more quickly!

Note: You can also resize lots of pictures at once... select them all then follow the above instructions. If you'd like a more detailed explanation of this, please contact me, I'd love to help!

Part Two: Resizing for Prints
I'm sure you've all uploaded pictures to have printed at your local drugstore/Target/favorite photo site and seen the message that says something to the effect of "your pictures are not really 4x6 even though you want 4x6 prints, we'll crop them for you", and then when you've picked up the pictures someone's head is chopped off just a little, but that great picture is now not-so-great. This is also helpful when resizing a picture to something like an 8x10, which has a different aspect ratio than what the picture has by default.

Step 1: Choose your image, then select "Crop".


Step 2: From the drop-down menu, select the size photo you'd like to have.


Step 3: Adjust the selected region on the photo so that no one's head is chopped off & you're seeing what you'd like to see. As you stretch the box that selects the region, the aspect ratio will not change, so no matter how you move or shrink the box, you'll end up with a picture that prints at the correct size. After you have the picture in the selected region looking like you want, click "Apply".


Step 4: The final step is to export the picture. Follow the steps in part one of this tutorial. Then, use the exported picture to order prints & have them come back just as you expect every time!

Monday, July 29, 2013

a little progress on a GIANT churn dash + question

This weekend's project was piecing this fun giant churn dash for a baby quilt top.

big churn dash #1

The pattern came from Camille Roskelley's latest book Simply Retro, although it would be relatively simple to turn any of your favorite quilt blocks into one giant block that's perfect for a baby quilt. I loved how quickly this quilt top came together & can't wait to finish it!

big churn dash #2

The fabric I have for the backing is my favorite of the four fabrics I picked for this quilt. Looking forward to showing you, but I'll wait until the quilt is finished. You'll just have to check back to see!

Question: How would you quilt this? I'm considering zig-zag quilting (as shown in Simply Retro), a big spiral, or possibly concentric squares. What's your pick? Any other ideas?

And if you're stopping by from Plum & June's Let's Get Acquainted Link Up, thanks for checking in! I hope you'll take a look around & come back soon!

Thursday, July 25, 2013

Pillowcase Dress

This pillowcase dress was made for a group who sews for charity. I'd love to tell you more about that group later... so for now, onto the dress!

I've heard how easy pillowcase dresses are, but was still a little skeptical. Well, not anymore! This was a super-quick, fun project. The pattern came from Nancy's Notions. There are no pictures with the pattern, though, so here's how it looks.

Step 1: Cut a piece of fabric to the appropriate length, based on the guidelines in the pattern. I was sewing a size Medium.

Step 2: Match selvages & sew. You don't even have to cut off the selvage! You now have a big tube.
Step 3: Center the seam on the back of the tube.
  And cut out the armholes, using the pattern.

 Step 4: Fold under casing, then edgestitch. My elastic was 3/8" instead of 1/4" like the pattern suggested, so I just made the casing a little bit wider.

Step 5: Thread elastic through casing, stitching at both ends. To make this easier, I didn't actually cut the elastic at first. Instead, I marked 7" from the start and pulled the elastic all the way through the casing. Once the elastic was all the way through, I stitched the "free" end to the dress, then gathered the top until I found where I had marked the 7". Then it was easy to stitch this down without worrying about the elastic disappearing into the casing.
 Step 6: Cut length of bias tape & stitch over raw edges on armholes. This also hides the elastic. I did not bother turning in the raw ends of the bias tape, and also cut the bias tape only 36". This way, 1 pack of bias tape could be used for 1.5 dresses.
Step 7: Hem the bottom, and you're done! Tada - one delightful pillowcase dress!


You can also add embellishments or pockets to the dress if you want, but I loved this one just how it was. I definitely want to make more of these. Seems like this would also be a really fun project to make with a little girl learning to sew.

Wednesday, July 24, 2013

Subscribe to Homemade Engineer!

If you're stopping by here a little more often these days (which I hope you are!), you might be interested in subscribing to Homemade Engineer.

 I talked a while ago about my new preference for Feedly, but there are lots of other ways to make sure you stay up to date. Many of you prefer to subscribe by Bloglovin' or by email. Or, if you use a different RSS reader, subscribe to the RSS feed here.

 Don't worry, I won't have boring posts like this too often, but subscribing to blogs has been a great way to SIMPLIFY, which I'm all about. Reading blogs from a reader instead of checking the actual site every day gives me more time to, well, read more blogs!

And as always, feel free to contact me with any comments, questions, or great ideas!

Any other favorite ways to follow blogs that I haven't mentioned?

Tuesday, July 23, 2013

What's Stitching with Susan: Granny Square Chair

Today's first-ever "What's Stitching with Susan" post is brought to you straight from my mom! Thanks for guest posting, Mom. :)

Thanks Rebekah for letting me share my finished project on your blog! So for my story... my sister gave me an antique oak chair for my birthday, with intentions of me doing some kind of patchwork seat. (Rebekah here... I love this idea of giving a birthday present that is also a fun project!)


After several weeks of searching for a pattern, nothing seemed to get me excited. When I saw Rebekah's Granny Square, I knew that would work well. I used the same Blue Elephant Stitches tutorial. Rebekah picked out my fabrics for me. I think she has a great eye for color! (Thanks, Mom!) Then I used Essex Linen in Flax for the outer, solid squares.  


To make the block, I cut my squares to 2.75" (instead of the suggested 2.5") to allow the finished block to cover more of the padded seat. There are also extra Essex Linen squares added on each side. A small strip of linen fabric is then added to get the block to the size I needed to wrap around my padded seat. 

To finish the seat cover, all you have to do is pin-baste a square of batting (I like to use Warm and Natural) to the back of the block and machine or hand quilt, whatever you like. I hand quilted around each block with DMC Perle Cotton No. 8. Wrap your finished square around your seat pad, being careful at corners, then use a staple gun to secure in place. There you have it!  A quick quilting project that surely adds some color and style to the chair's new home. My chair is finding its new home in the sewing room!